Contents:
- What Is Ombre Hair and Why It’s Worth Your Time
- Know Your Hair Type and Current Condition
- Budget Breakdown: DIY vs. Salon Ombre in 2026
- Salon Ombre Costs
- DIY Ombre Kit Costs
- Essential Supplies for Home Ombre
- The Core Arsenal
- Protection and Aftercare
- Step-by-Step: How to Ombre Hair at Home
- Preparation (24 hours before)
- Application Day
- The Styling Day After
- Common Ombre Mistakes and How to Avoid Them
- Harsh Lines Between Shades
- Uneven Lightness
- Over-Processed Hair
- Brassy Tones You Can’t Tone Out
- Maintaining Your Ombre Between Salon or DIY Touch-Ups
- Ombre for Different Hair Lengths and Textures
- Ombre on Short Hair (Above Chin)
- Ombre on Long, Straight Hair
- Ombre on Curly or Textured Hair
- When to Call in a Professional
- The Financial Case for DIY Ombre
- FAQ: DIY Ombre Hair
- How often should I do ombre maintenance?
- Can I ombre dyed hair without damaging it further?
- What’s the difference between ombre, balayage, and sombre?
- Will ombre work on very dark or black hair?
- How do I prevent brassiness in my ombre?
- Your Ombre Timeline: From Now to Transformation
Want to transform your hair from solid colour to a gradient without spending £150+ at a salon? Learning how to ombre hair yourself opens up endless possibilities—and it’s far easier than you’d think. The ombre technique has evolved significantly since its peak in 2012, and modern approaches yield results that rival professional work.
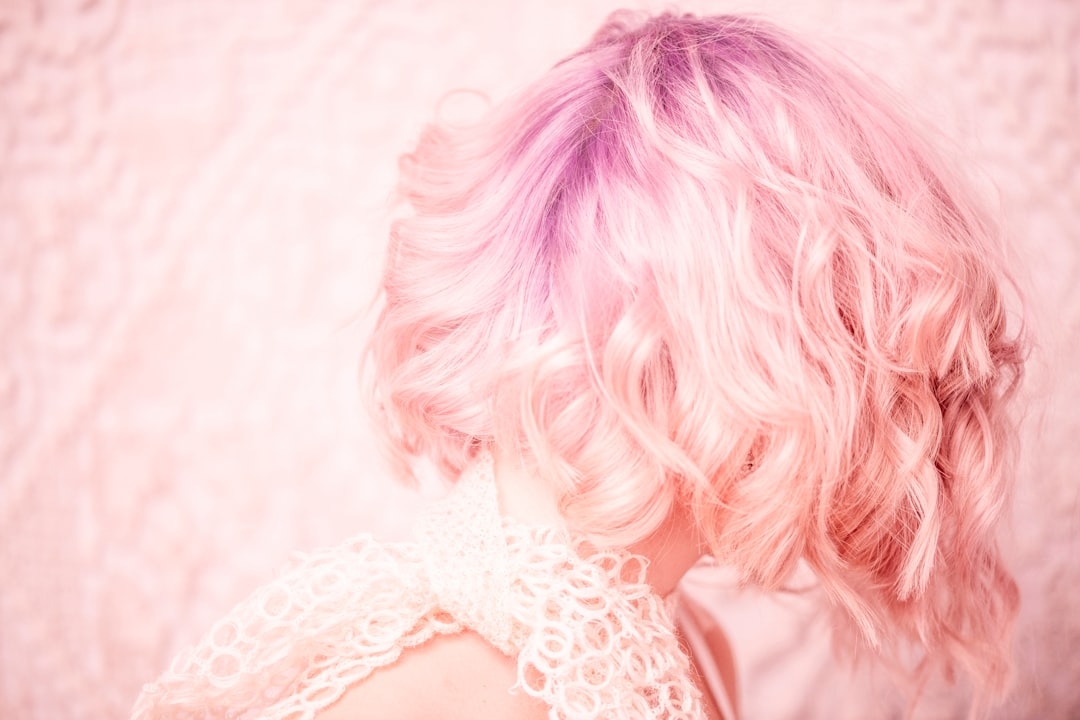
What Is Ombre Hair and Why It’s Worth Your Time
Ombre is a hair colouring technique that blends two or more shades, darkest at the roots and gradually lightening towards the ends. Unlike balayage (hand-painted, more random) or sombre (subtle, darker version), ombre follows a deliberate gradient that creates a bold, dimensional look.
The appeal is practical: ombre requires fewer touch-ups than all-over colour because the roots are intentionally darker. You can wait 8-12 weeks between maintenance rather than 4-6 weeks. It also offers creative freedom. Natural brunette? Go ombre to honey. Black hair? Fade to caramel. Blonde? Deepen the base and keep pale tips.
Regional trends matter. In London and Southeast England, softer, closer-to-root ombre (sometimes called “shadow roots”) dominates. Up North, particularly Manchester and Sheffield, bolder, higher-contrast ombre with distinct two-tone separation is more popular. Scottish salons tend toward warmer, copper-toned ombre on darker bases. Western regions favour sun-bleached, beachy interpretations.
Know Your Hair Type and Current Condition
Before opening a bleach bottle, assess your hair honestly. Ombre works best on hair that’s not already severely damaged. If your hair is porous, brittle, or has broken off from previous bleaching, ombre isn’t your best choice right now. Heal your hair first with deep conditioning treatments for 2-3 months.
Your hair’s natural colour determines what you can achieve:
- Dark brown or black hair: Bleaching to blonde requires 20-40 minutes processing time and may need two sessions 2-4 weeks apart. Expect spending £25-45 on lightening products.
- Medium brown hair: Bleaching to light blonde takes 15-30 minutes. Warm, honey tones emerge naturally. One session usually suffices.
- Light brown or dark blonde: Fades to pale blonde in 10-20 minutes. Minimal damage risk. One session is typically enough.
- Already blonde: You may only need toner or a semi-permanent pastel shade applied to ends. No bleach needed.
The porosity test reveals how your hair absorbs colour. Wet a small section and squeeze water. Hair that releases water slowly is low-porosity; fast release means high-porosity. High-porosity hair lifts colour quickly but can grab blonde unevenly. You’ll need more even sectioning and shorter processing times.
Budget Breakdown: DIY vs. Salon Ombre in 2026
The cost difference is significant:
Salon Ombre Costs
- London and Southeast: £120-250
- Midlands and North: £80-150
- Scotland and Wales: £90-160
- High-end salons: £200-400+
DIY Ombre Kit Costs
- Lightening powder and developer: £8-18
- Toner or colour: £5-15
- Colour depositing conditioner (optional but recommended): £6-12
- Processing bowls, brushes, sectioning clips: £4-8 (one-time)
- Deep conditioning treatments post-ombre: £4-10
- Total first-time cost: £27-63
- Subsequent touch-ups: £5-15 (just toner/colour)
Even accounting for potential mistakes, DIY saves £60-200 on first application. Most people recoup this investment within 2-3 maintenance touch-ups.
Essential Supplies for Home Ombre
The Core Arsenal
You’ll need proper lightening powder (not kitchen bleach—that damages hair irreparably). 20 or 30 volume developer is standard; 30 volume lifts colour faster but requires more precision. Recommended products include Schwarzkopf Igora Vario Bleach and Wella Blondor Pale Blonde Creme, both available at Boots and Superdrug (£8-15 per box).
For toning, if your lightened hair turns brassy yellow, use a purple or ash toner. Wella T18 (ash blonde) or T14 (pale blonde) cost £5-8. For warmer tones, Schwarzkopf Igora Royal in 9-4 (extra light blonde beige) gives honey gold.
Sectioning tools matter more than you’d expect. Buy proper sectioning clips (£3-5), not hair grips. A tail comb with a fine point helps create precise lines. Colouring bowls should be ceramic or plastic—never metal, which reacts with bleach.
Protection and Aftercare
Barrier cream (like vaseline applied to hairline, ears, and neck) prevents bleach burns. A colour-safe shampoo and conditioner preserve your ombre as it fades. Purple shampoo (Fanola No Yellow, £5-8) removes brassy tones if your ombre shifts yellow-orange between toning sessions.
Step-by-Step: How to Ombre Hair at Home
Preparation (24 hours before)
Do a strand test. Mix a small amount of bleach and developer on a hidden under-layer and process for the full recommended time. This tells you exactly how light your hair will go and reveals any unexpected reactions. Don’t skip this—it’s the difference between gorgeous ombre and patchy, over-processed hair.
The night before, apply a generous deep conditioner to your entire head. This gives your hair optimal moisture before bleaching. Your roots and mid-lengths don’t need bleaching (they’re darker naturally), so this pre-treatment protects them.
Application Day
Step 1: Divide Hair Into Sections
Part your hair down the middle from forehead to nape. Create a second horizontal part from ear to ear across the back. You now have four quadrants. Clip each section. This prevents you from over-processing some areas while others lighten unevenly.
Step 2: Decide Your Placement
Mark where you want the transition point. For most people, ombre begins at the mid-length (around ear level) and deepens toward ends. On longer hair (past shoulders), start 3-4 inches above bra line. On shorter hair (chin-length or above), start higher—around ear level or slightly above.
Step 3: Mix Lightener
Mix bleach and developer in a 1:2 ratio (check instructions—some powders differ). Stir thoroughly until you get a smooth, lump-free consistency. The mixture should resemble peanut butter, not runny liquid. Work quickly; mixed bleach loses potency after 30-45 minutes.
Step 4: Apply Bleach From Ends Upward
Start at the ends of your hair, applying bleach in 1-inch sections. Work upward, stopping 2-3 inches above your predetermined transition point. Apply bleach thoroughly, saturating each section. Hands-on application (not just spraying) ensures even coverage. Take 15-20 minutes on this step—rushing causes patchy results.
At the transition zone, use a clean brush to feather the bleach upward in light strokes. This gradient prevents harsh lines. Your roots (within 1-2 inches of scalp) should remain unbleached.
Step 5: Monitor Processing
Check your hair every 5 minutes after 10 minutes of processing. Lighter hair lifts faster. The goal is pale yellow (virgin blonde), not white. Processing too long causes breakage. Most hair reaches the right stage in 20-30 minutes on medium brown hair, 15-20 on lighter hair. First-time ombre often requires two sessions to reach full lightness—this is normal and safer.
Step 6: Rinse and Condition
Rinse with cool water (not hot—that opens the cuticle further and can cause more lightened hair to shed). Use a colour-safe conditioner immediately after rinsing bleach. Leave it on for 5-10 minutes. This re-closes the cuticle and restores moisture.
Step 7: Apply Toner (if needed)
If your lightened hair is pale yellow, apply toner. Mix toner and developer (usually 1:2 ratio), apply to lightened lengths only, and process for 20-30 minutes. Toner shifts brassy yellow to ash, platinum, or warm blonde depending on your choice. Rinse and condition again.
The Styling Day After
Wait 24-48 hours before washing ombre hair. This lets the cuticle fully settle. When you do wash, use cool water and colour-safe products. Your ombre will have slightly different texture than unbleached roots—the lightened lengths are porous and need more moisture. Deep condition weekly for the first month.
Common Ombre Mistakes and How to Avoid Them
Harsh Lines Between Shades
A blended gradient requires feathering bleach at the transition zone. Don’t paint a sharp line. Instead, use a clean brush to blend upward with light, quick strokes for about 2 inches above your ombre line.
Uneven Lightness
This happens when hair isn’t saturated evenly or when application time varies. Solution: work section by section methodically. Spend the same time on each section. Don’t rush the application phase.
Over-Processed Hair
If you process too long, hair becomes gummy and may snap off. Set a timer. Check at 10 minutes, then every 2-3 minutes. The first time you try ombre, err on the side of slightly underprocessing—you can always go lighter with a second session.
Brassy Tones You Can’t Tone Out
If your lightened hair is orange rather than pale yellow, no toner will turn it silver—it’ll turn green. In this case, you need to lighten further before toning. Plan a second lightening session 1-2 weeks later (with deep conditioning between sessions).
Maintaining Your Ombre Between Salon or DIY Touch-Ups
Your ombre will fade. Lightened, bleached hair absorbs pigment differently than natural hair, and colour molecules wash out gradually. Plan maintenance:
- Weeks 1-4: Colour looks fresh. Wash weekly in cool water.
- Weeks 5-8: Roots grow out; ombre slightly fades. Consider root touch-up with semi-permanent dark colour matching your natural shade (£4-8 at Superdrug). This refreshes the root-to-mid-length contrast.
- Weeks 9-12: Ombre noticeably lighter. Apply colour-depositing conditioner (Fanola No Yellow or similar, £5-10) 1-2x weekly to refresh tone and depth. This extends the life without bleaching.
- Weeks 13+: Full ombre refresh needed. Bleach the entire lightened area again (20-25 minutes) and tone.
Ombre for Different Hair Lengths and Textures
Ombre on Short Hair (Above Chin)
Start higher—at or slightly above ear level—to ensure visible gradation. Even 2-3 inches of blonde looks dramatic on very short hair. Process for shorter times (10-15 minutes) because short hair has less weight and lifts colour fast. The contrast is punchy and requires maintenance every 8 weeks.
Ombre on Long, Straight Hair
The classic ombre canvas. Start at mid-length and fade to ends. You’ll need more bleach (longer sections take more product). Processing time varies—ends might lighten in 15 minutes while mid-lengths take 25. Apply bleach to ends first, then work upward, checking progress frequently. This is where feathering matters most because straight hair shows every line.
Ombre on Curly or Textured Hair
Curly hair processes faster (more surface area for bleach to act) and can appear uneven because curl pattern hides some sections. Apply bleach thoroughly, working it through curls with your fingers. Check progress at 10 minutes. You may need slightly longer processing on tighter textures (locs, tight coils) but much shorter on loose waves. Texture also shows ombre more dramatically—the dimension pops against curl definition.
When to Call in a Professional
Some scenarios warrant a salon visit:
- Previously coloured hair: If you’ve had permanent colour (especially dark) for years, DIY lightening can grab unevenly or cause patchy results. Professionals can cut through product buildup.
- Severely damaged hair: If your hair is gummy, breaks easily, or has melted ends, bleaching will worsen it. Repair first.
- Very dark hair: Black or very dark brown hair requires skilled hand to reach pale blonde without multiple sessions. Professionals have faster-lifting formulas.
- First attempt jitters: If you’re nervous, a £50-80 professional ombre (regional prices) is worth the peace of mind.
The Financial Case for DIY Ombre
Over 12 months, maintaining ombre costs:
- One professional ombre: £120-250
- Plus 3 touch-ups at salon: £360-750 + products = £480-1,000 annually
- DIY: initial ombre (£27-63) + 3 colour touch-ups at £5-15 each + conditioner (£10-20) = £57-113 annually
The savings are substantial, particularly if you do multiple ombre touch-ups yearly. For frequent colour-seekers, DIY ombre pays for itself within one maintenance cycle.
FAQ: DIY Ombre Hair
How often should I do ombre maintenance?
Professional ombre typically requires full refresh every 12 weeks. Root touch-ups can extend this to 16 weeks. Between full refreshes, colour-depositing conditioner keeps your ombre vibrant without bleaching. Many people do root touch-ups at 6-8 weeks and full ombre refresh at 12-14 weeks.
Can I ombre dyed hair without damaging it further?
Yes, if the dye was applied 4+ weeks ago. Permanent colour settles and stabilizes after a few weeks. If your hair is already damaged from previous colouring, deep condition for 2-3 weeks before attempting ombre. Do a strand test to ensure lightening won’t cause breakage.
What’s the difference between ombre, balayage, and sombre?
Ombre is a planned gradient from dark to light in a deliberate pattern. Balayage is hand-painted colour placement for a more random, natural look—often darker overall. Sombre (soft ombre) is a subtle version with less contrast and a slower, more gradual transition. For DIY, ombre is easiest because you can map it out with sections.
Will ombre work on very dark or black hair?
Yes, but it requires patience. Black hair needs 30-40 minutes processing and may need two sessions. The first session lightens to dark brown, the second (1-2 weeks later, with conditioning between) lifts to medium or light brown. Going black to blonde takes 2-3 sessions over 4-6 weeks. This is a valid choice, but plan accordingly.
How do I prevent brassiness in my ombre?
Use purple shampoo (purple neutralises yellow) weekly for the first month after bleaching. If brassiness creeps in later, do a weekly purple shampoo treatment. For warm, honey tones (desirable ombre) skip purple shampoo and use warm-toned toner instead. The goal is consistent tone, not fighting your hair’s natural lightened colour.
Your Ombre Timeline: From Now to Transformation
Today, gather supplies (£27-63 spent). Tomorrow, do your strand test. Next weekend, apply ombre. By day three post-ombre, you’ll have a full dimensional look. Week 4, plan your first root touch-up. Week 12, refresh your ombre with new bleach and toner. By month 4, you’ll have saved £100-200 versus salon visits whilst building genuine expertise in maintaining your own colour.
Learning how to ombre hair yourself is an investment in both style and capability. The first attempt takes focus and time, but subsequent touch-ups take 30-45 minutes. You’ll save thousands over a lifetime of colour maintenance. Start with a strand test, follow the steps, and trust the process. Ombre is forgiving—if results aren’t perfect the first time, a second session corrects almost any issue.